We are going to be creating a webpage using the express module in Node that will diplay an array of items to the page when the page is called.
If you know Javascript, then this will not be all that difficult.
Now, open up Visual Studio through searching the start menu.
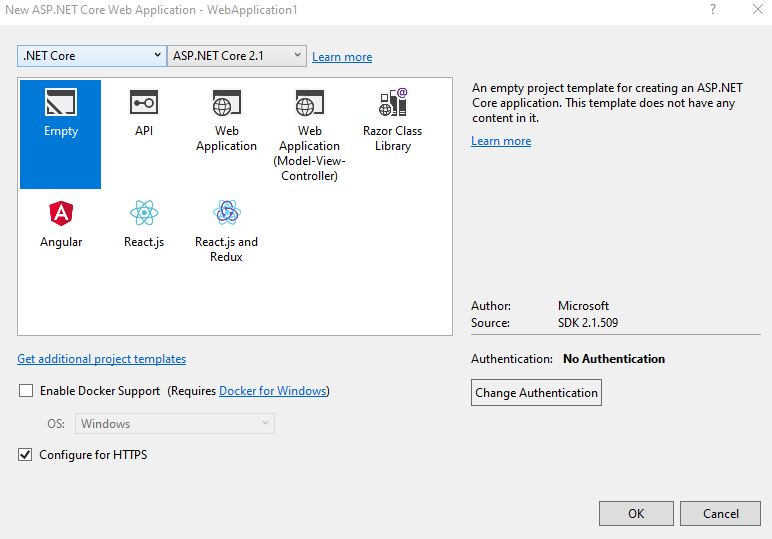
Click 'file' in the top right hand corner, click new, and then click project. A pop-up similar to this should have popped up.
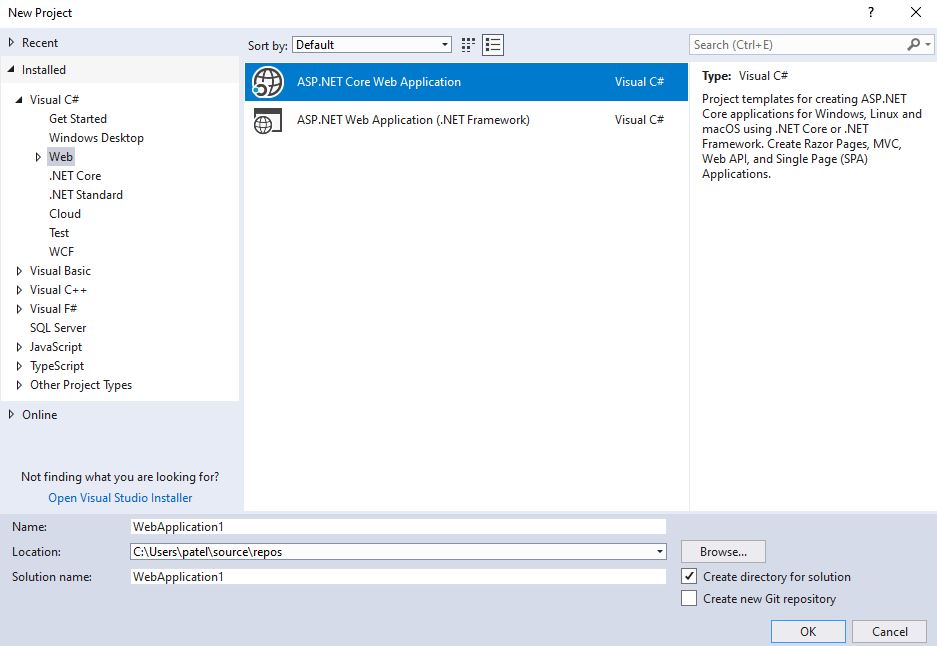
Your pop-up may open up a different default. That's fine. As long as you see something similar to the image above, you're on the right track!
Regardless of what the default type of project is, click on Web and select ASP .NET Core Web Application. Name the file whatever you like and make
sure to save the project in the same location as the excel file. To change the location, click on 'Browse' next to the location
and select your desired location.
You may also see another popup in front of you once you click enter. This pop-up is where you choose what kind of an application you are
trying to build. The pop-up should be something like this. Select empty and click enter!
Now, we are going to be working with javascript and so we will need a javascript file. To add a javascript file to your project, do the following:
-
Click file in the upper right-hand corner, go to new, and click file.
Upon completion of the previous step, your screen should look like this,
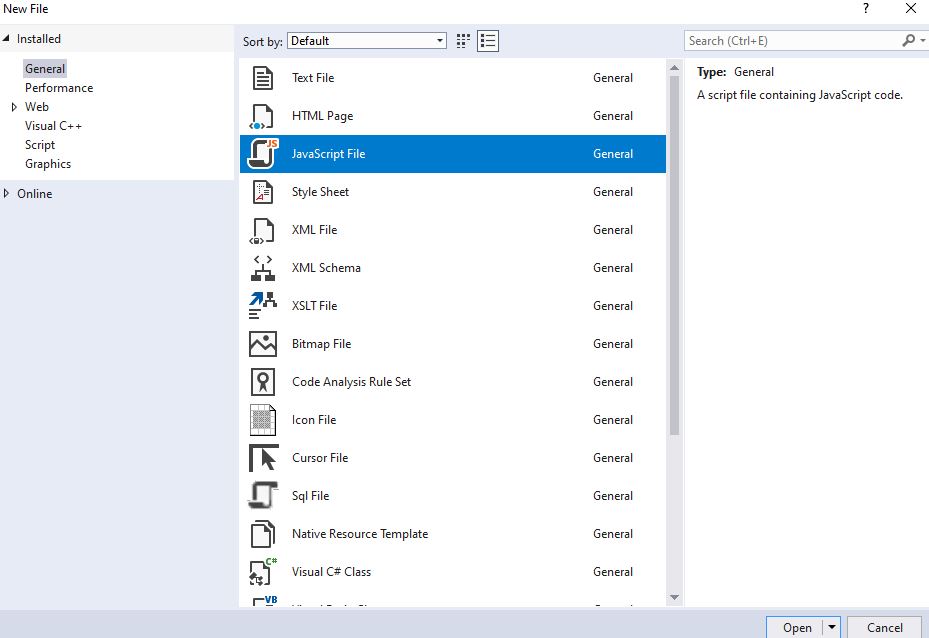
- Select Javascript from the list of options and click open.
If you had a blank Javscript file open after you completed the above steps, then you are on the right track!
If your screens look similar to mine then you are on the right track! We're going to be working with the javascript file for a bit now.
To get started with working with node, we must let the server know what module we are going to be using for our project. To do that, write the following code,
in your javascript file I will be referring to this file as the server file.
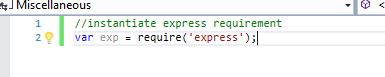
Notice how we are calling the express module and storing it in the exp variable. From now on, whenever we want to utilize express, we will use the exp variable.
Now, we need to create a variable that will help us run the express app. To do this, add the following line of code to your Javascript file:

Next we need to instantiate ejs templates. EJS templates allow us to generate HTML markup using Javascript. This is going to be crucial for our tutorial because
EJS is going to allow us to display our node results on the page. To instantiate node, add the following line of code to your Javascript file.

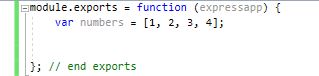
Now, we are going to create a simple file that will help us in terms of routing protocols. To do so, create another javascript file using the steps above
and name it controller. The first thing we are going to do in this file is use the expressapp variable from the first file as input to our module.exports function.
Next we are going to create an array of integers. This array is what we are going to display on our page.
This is what the code to do that will look like.
Next, we are going to add a get protocol to this function. What this method is going to do is complete a set of tasks, in our case display the array we created, when the
appropriate web page is called. It is going to take 2 parameters.
- First parameter is the the route. What is going to be the route that will be needed in order to excecute the tasks that are a part of this function.
-
Second parameter is a function. The function takes 2 parameters as well. One is the request and one is the response. The request is the url that the user wants.
The response is the server's response. How is the server going to respond to the request based on the information it has.
To set up this get method, add the following code in the method we created above.
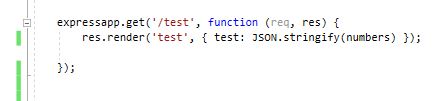
Let's break down the code.
- The first parameter is '/test'. This is going to be the route of the html page you will shortly see me create. Feel free to
give this any route you like. However, keep in mind that the route you give it is going to be the route you use to access the page
and to test this demo.
- If you recall, I mentioned a request and a response. I shorthanded those terms to be 'req' and 'res'.
- res.render is how the server is going to respond to the client's request.'
- The 'test' in the res.render, is the web page that is going to be opened up. This is the name of the webpage that you will shortly see
me create.
- The code inside of the curly braces, has to do with displaying the array. This line will make more sense when we start to work with the HTML
page. The key part to remember here is that we are converting our array into a string. This is the easiest way to get the array to display on
the webpage. Of course, you can use a for-loop to display the array in a prettier fashion but for the sake of this tutorial we will be
simply stringifying the array and displaying it like that.
That is all the code we need for the routing!
Before we continue to the next step of the tutorial, go back to he server file we created. This was the very first file we worked on.
Add the following line of code to that file

![]()
These lines of code enable us to use the controller file that we created and set up the route that we created.
Next, we will be creating a very simple HTML page.
The first thing we have to do is create a folder in the project and name it views. To add a folder to your project, right click on the solution,
click add new solution folder, and name it views. This is a very important step. When you set the express view engine to ejs, it looks for a views folder
by default. This folder will contain all ejs files that you have written. In this case, it will simply contain one.
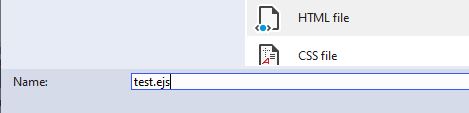
Now let's add a HTML page to your project, right-click on your project and click add. If you see HTML file from the drop down, click that!
Otherwise, click new item and look for HTML file. When you name the file, make sure it is the same name as the file name you put inside res.render.
For example, since I put 'test', I will be naming by file test. The key here is to save it as an ejs file. To do that, simply add .ejs as the extension
for the file. This is what your file name should look like, if you are naming it test.
Great! Now you have created an HTML file!
The first thing we are going to do here is add a simple heading. To do that let's add h1 tags to our file.
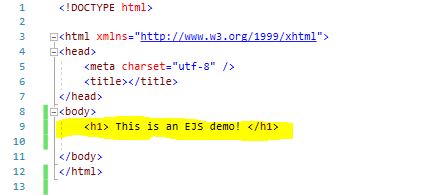
If you don't know HTML, here's a a brief explanation on the tag. The h1 tag adds a heading to your page. There are also h2, h3, and h4 tags.
The biggest difference between these tags if the size. H1 tags are the largest by default. For example, the title of this page
is Let's Learn Node.JS and that is an example of an h1 tag.
You can add ther text if you so like
The most important part of this page is going to be adding a line of code that will let the server know that this is where we want the array
displayed. This is actually very simple and it uses and EJS template. Add the following line of code inside the body tags of the HTML page.
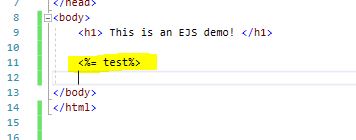
Notice how in between the arrows and the percentage signs I put test. If you recall, in our controller.js file, inside of the curly braces in res.render,
I had put 'test: '. The test there and the test that you see in the screenshot above are 100%. The test I used in res.render was me telling the server
"Hey, I want my array to displayed in the area that has test as an indicator". It is crucial that you put the same name in the HTML file that you
used in the controller.js file. Otherwise, your code will not give you the desired result. Now, let me talk about the symbols surronding test.
Those symbols are a part of EJS. This set of symbols and the 'test' lets the server know that this is the location that we want our result displayed.
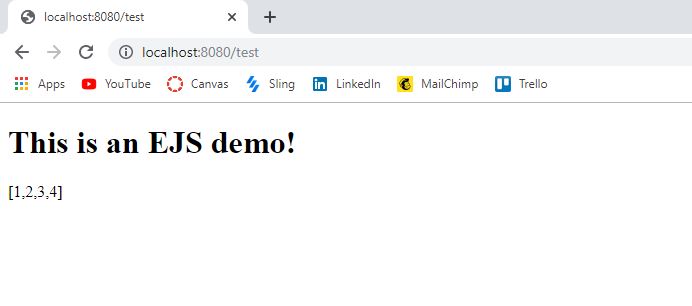
Now, for the best part! Let's run our program. To run it, click the green triangle at the top of the screen, on Visual Studio's toolbar.
If your result looks like mine, congratulations you did it!
If you couldn't get the result above, make sure that your route in the url and the route in the controller.js file match up.
Also make sure that you stringified the array in the controller.js file.