BLAZOR
By: Jason Huang & Faiyaz Islam



Blazor is a relatively new, free, open source framework. It was developed by Microsoft and published in 2018. Blazor consists of multiple core features that not only eases the development process of applications but also allows for better designed UIs and code. The foundation of Blazor is the ASP.NET core that allows developers access to .NET libraries. Additionally, Blazor uses C# instead of Javascript to create functional code alongside HTML and CSS.

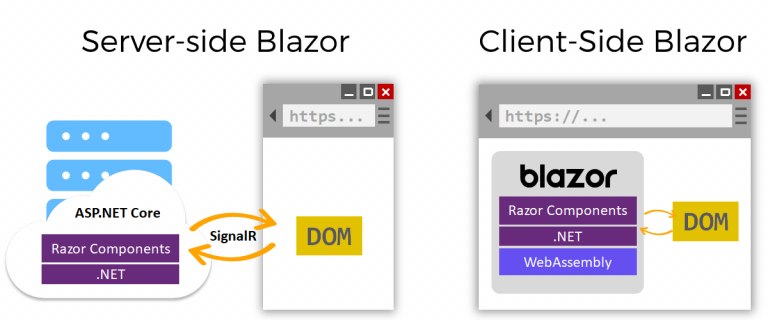
Another useful feature of Blazor is that it allows developers to create both server-side and client-side applications. The framework offers two types of hosting models: WebAssembly and Server. WebAssembly is the client-side version that runs the application code directly on the browser. Meanwhile, Server is, as the name suggests, the server-side version that executes the code on a server within the ASP.NET core application and uses a SignalR connection to maintain communicatin between the client's browser and the server.
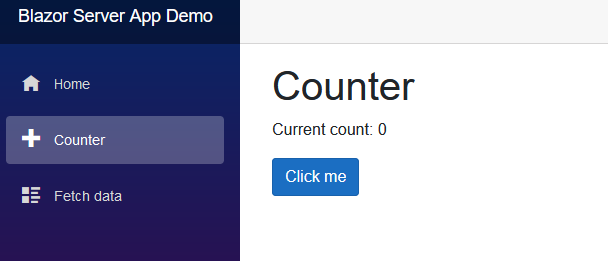
Another core feature of Blazor is that it utilizes Razor to create components. Components prove to be incredibly useful as these elements can be reused throughout the application. Furthermore, with the ability to share with .NET libraries, components can be shared between the community. In the demo Blazor application, the Counter page is composed of multiple components. The counter button is one component and the navigation bar on the side is another. The entire Counter page itself is a component and can be reused as well. The flexibility of components allows developers to easily create diverse UIs and expand their applicatons better than other frameworks.
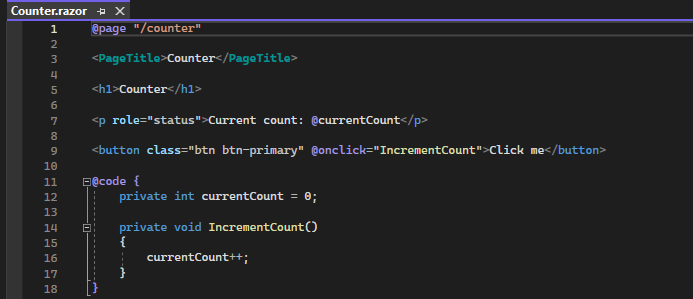
In Blazor, components and pages are created using Razor. Razor is a markup language that allows developers to create a collection of both browser code and server code. In fact, Blazor's name comes from the combination of 'browser' and 'Razor' because this feature is a core component of the framework. In the image below, the code for the Counter page is displayed. Razor allows both HTML and C# code to be written in the same file to create a single web page. C# can also be directly added into HTML elements. This feature facilitates the development of applications and websites.
In order to work with Blazor, a version of Visual Studio must be installed. In this demo, the 2022 version of Visual Studio Enterprise is being downloaded. The download of this application can be found on the offical Microsoft website. If you are a college student, Microsoft Azure allows free access to the IDE, as shown below.

Alongside this IDE, the latest version of .NET Core must be installed, but that software should automatically come with Visual Studio. If not, the Visual Studio Installer can be used to install the latest version.

Once the IDE and its components have been installed, the opening page will allow you to create a new project, as outlined in the image below.

Once that option has been chosen, there will be many options for the types of projects. There is a search bar at the top that will allow you to find the desired project template. In the upcoming demo of this tutorial, the Blazor WebAssembly App will be used to create an example application.

Name your project and choose the location of the file. The solution name can be changed to be different from the project name if desired.

The framework should automatically select the updated version of .NET. If not, either select the right framework or make sure you installed the most updated version if it cannnot be found. For this tutorial, the option for 'Configure to HTTPS' has been unselected to avoid potential issues as this will not be an official application.

Once everything has been properly installed and the project has been correctly created, the IDE should open to the project. Here, the index page, index.razor, has been selected to view. The Blazor projects come with a template application already created.

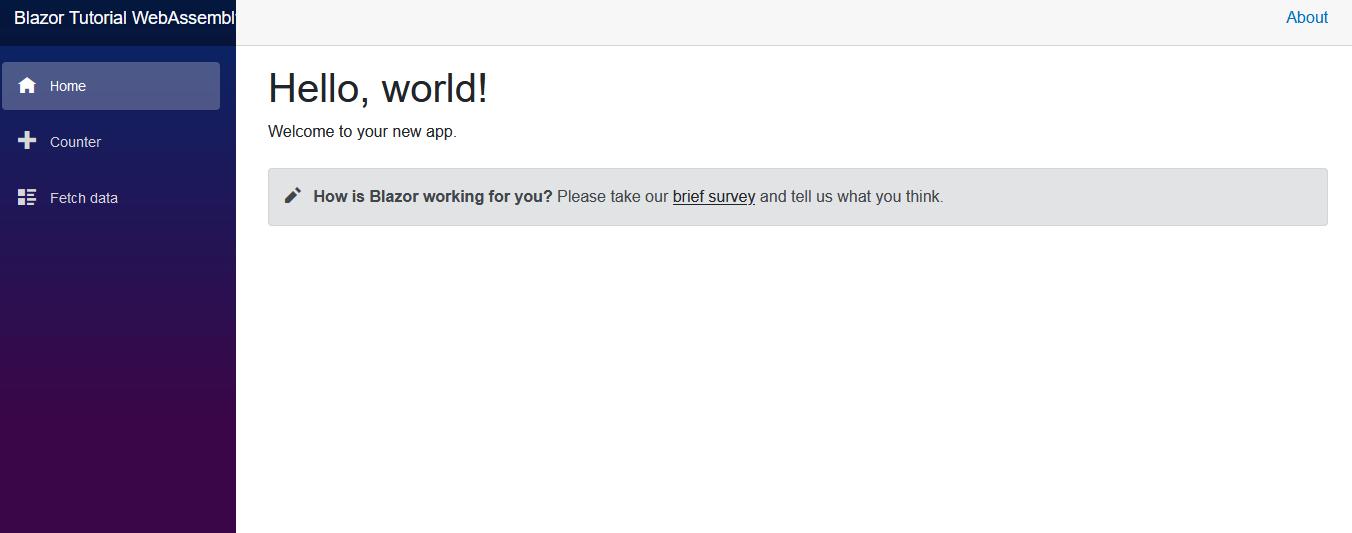
When the project is run or viewed with a target browser, the template Blazor application will be run and displayed. The image below is the home page of this template site. If the option to trust a certificate pops up, click 'Do Not Trust' for now.
This demo will show how to create new Blazor pages that use local storage to add and delete games to a cart page. To begin, open the project that was created.

First, here is a quick glance at the files in the solution explorer of the application. The pages folder is highlighted here and this is where the pages are stored in Blazor.
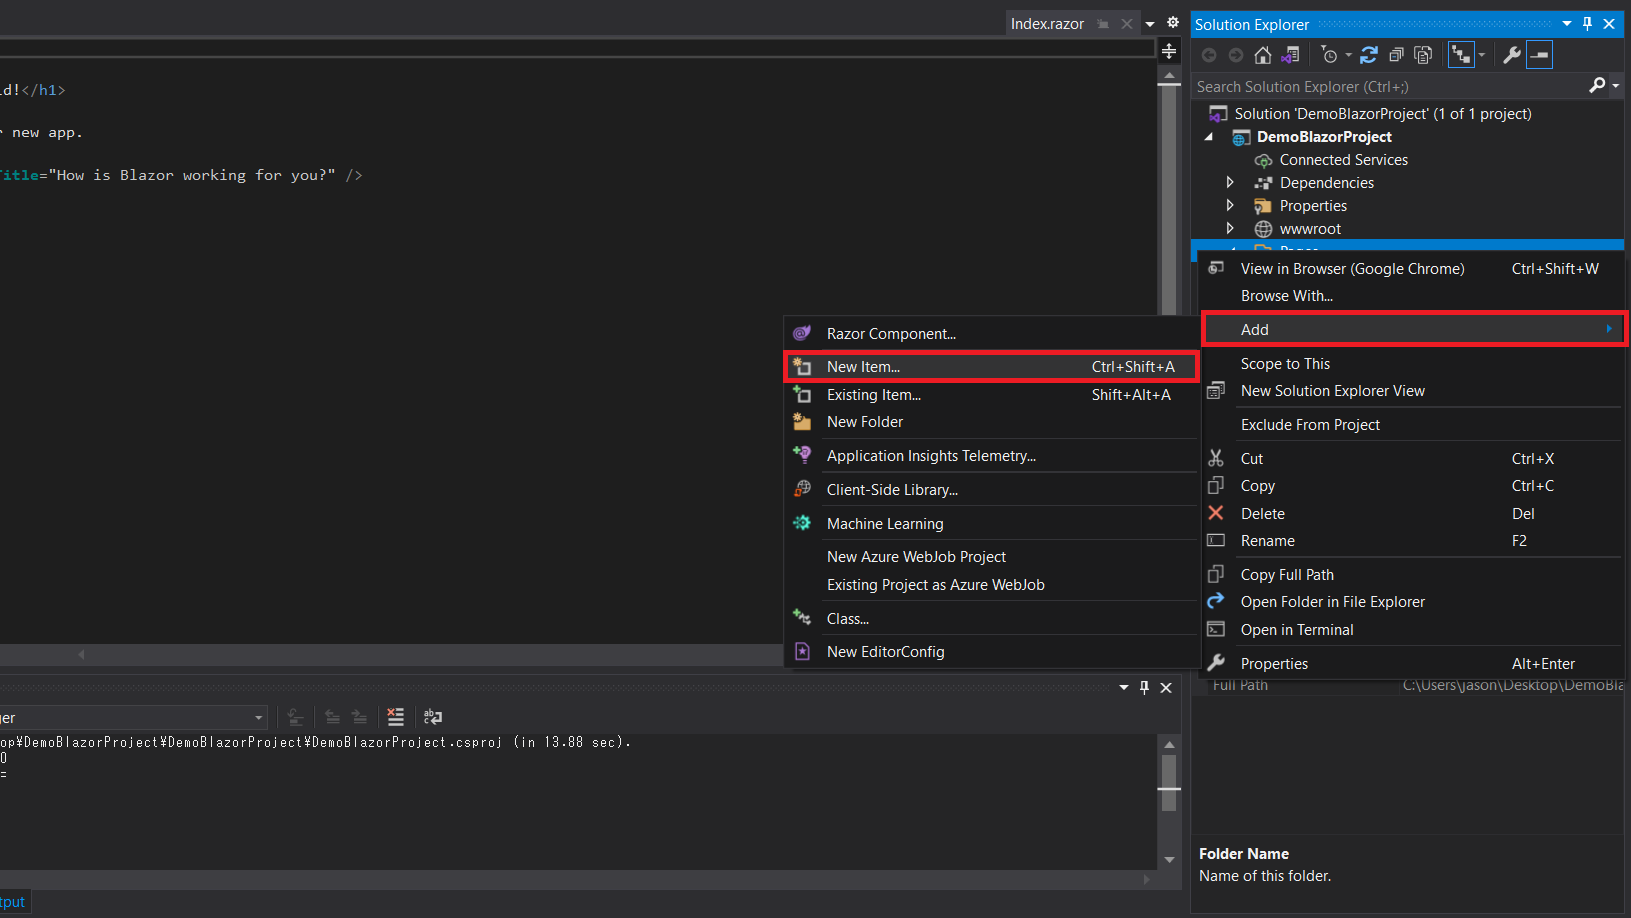
To add a page to the application, right-click the pages folder and hover add. In the add drop-down select "new item" to add a new component to the web application.
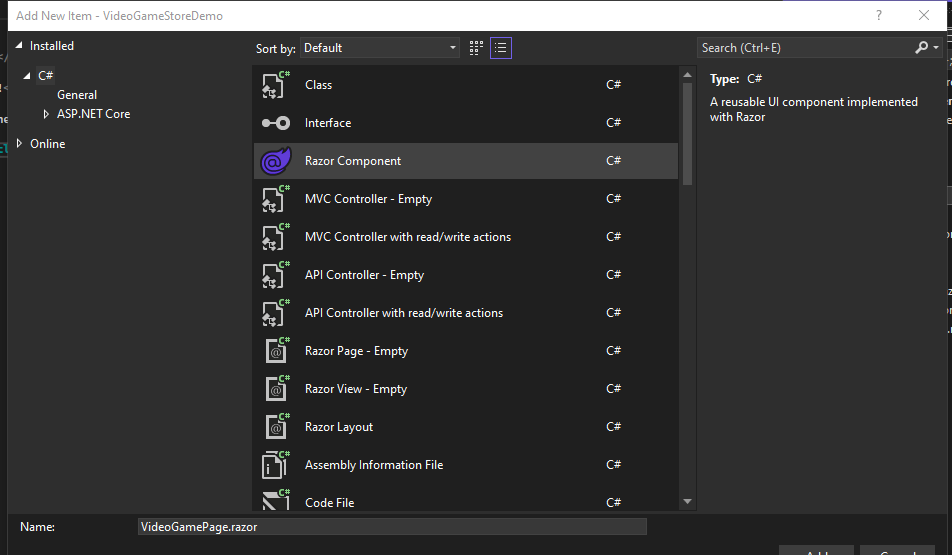
In the pop-up choose Razor component to create a new page. Then give the component/page a name. Here, we will be creating two pages: one page that will store all the video games and another that will be our cart page.
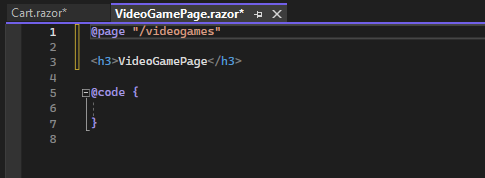
After creating a page, the @page directive is given to page for routing. In this demo, give the video game page and the cart
page the appropriate names at the top of the pages. The routing for the game page is shown.

After adding the routing, under the "shared" folder, find the NavMenu component. Here we will route the navbar to our new pages.
Simply replace the "href" for the Counter and Fetch data pages with "videogames" and "cart" routing.
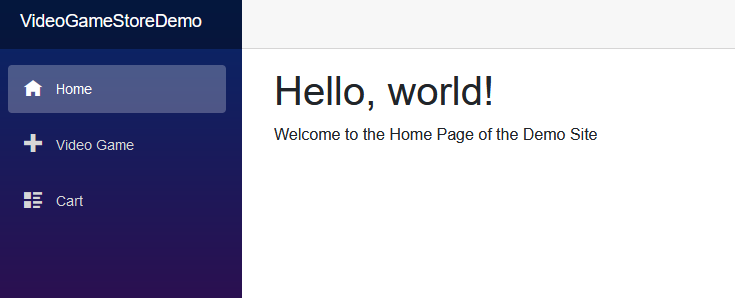
Once the navbar has been changed, modify the index page to your liking. Then run the application to see a similar website.
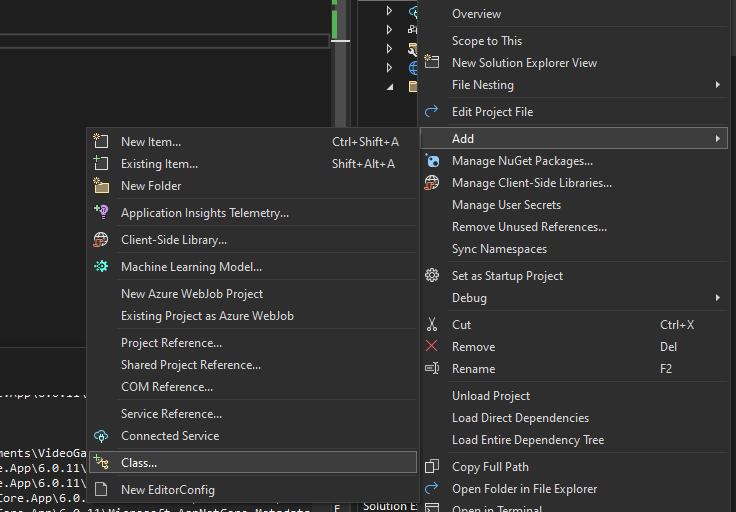
We will now create a class for video games. Go back into Visual Studio and right click on the project to add a class.
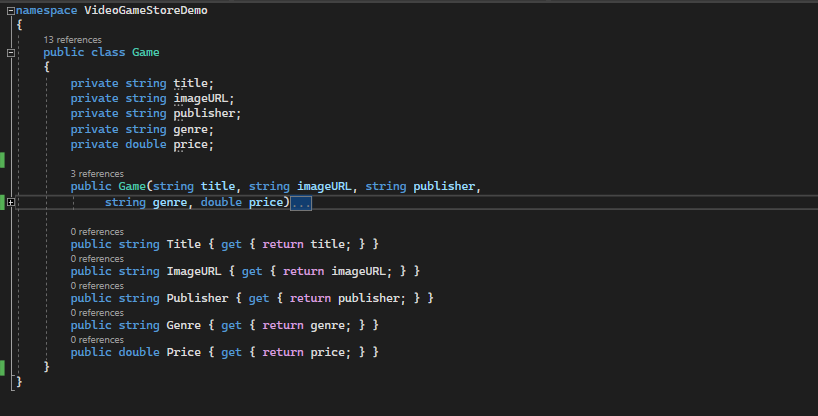
Create the fields, a simple constructor, and some get properties.
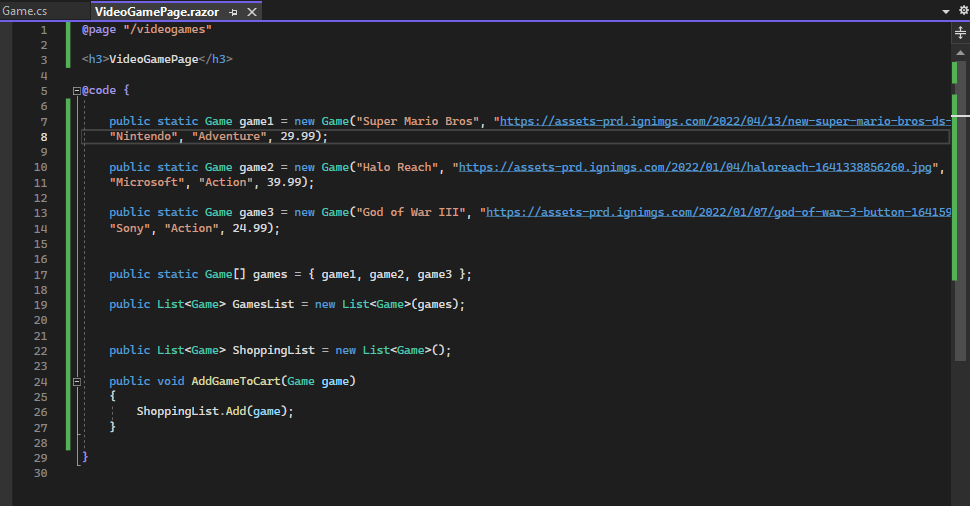
Once the class had been created, head to the video game page. Instantiate some games for the page. Afterwards, create an array to hold these games and then create a new list of games with that array. Then, create another list, ShoppingList, that will represent the games that we want to buy. Finally, create a method, AddToCart, that we will use to add a game to the ShoppingList.
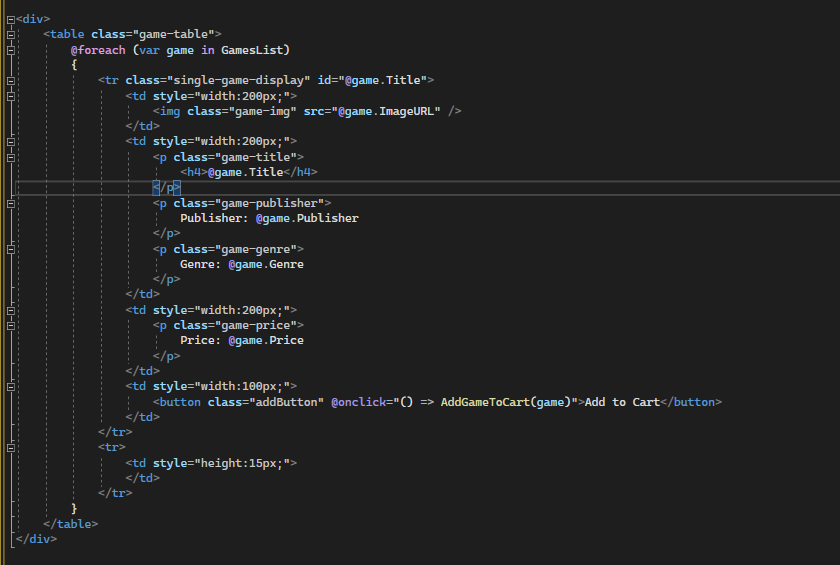
Now, we must create the HTML portion of the page to display the games. We will be using a table to construct a display. Create a foreach loop to create sections for each game in the table. At the end of each table row, we will create a button that will use the AddToCart method to add the game to the shopping list. Don't forget to add classes to HTML elements.

We will now add CSS to the page. In the project, there will be a file called "wwwroot". This file holds a folder called "css" which contains the "app.css" file. In this file, modify the video game page to look how you want.
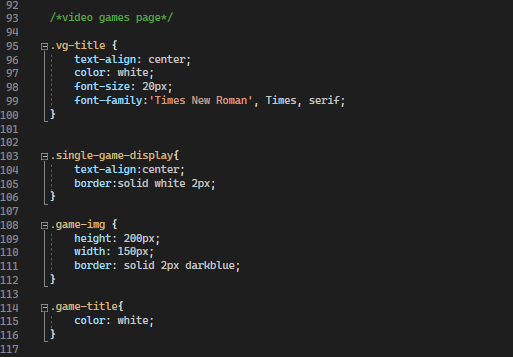
This is some sample CSS. Our CSS will be added towards the bottom of the file. The CSS for the rest of the site can be modified here.
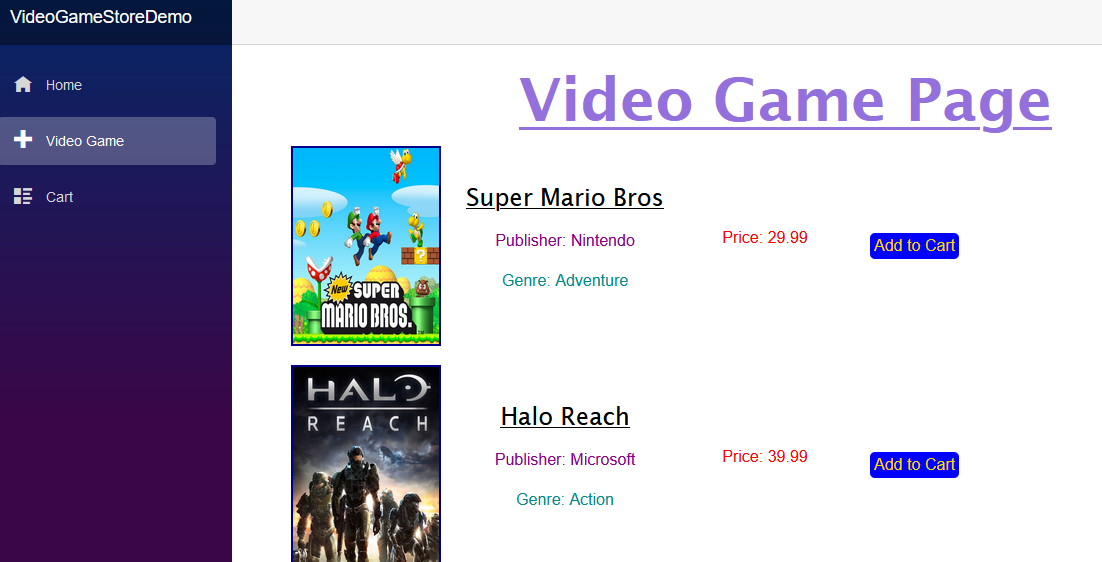
Run the application again and head to the video game page. The page could look something like this.
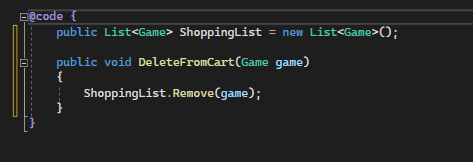
Now, go and create the code portion of the cart page.
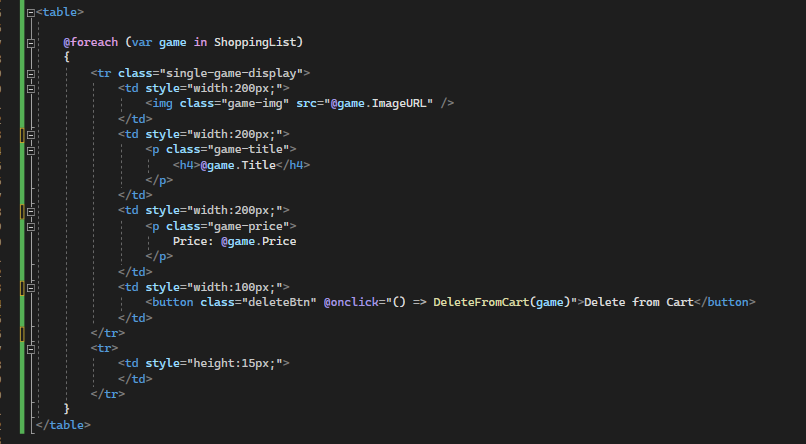
Create the HTML portion now. We will be using another table to display the games we buy. We will also be adding a button that will remove the game from the shopping list.

Once the cart page has been modified, add CSS to the page like the video games page. Run the page to see something like this. Since no games have been added yet, there should not be anything to view yet.
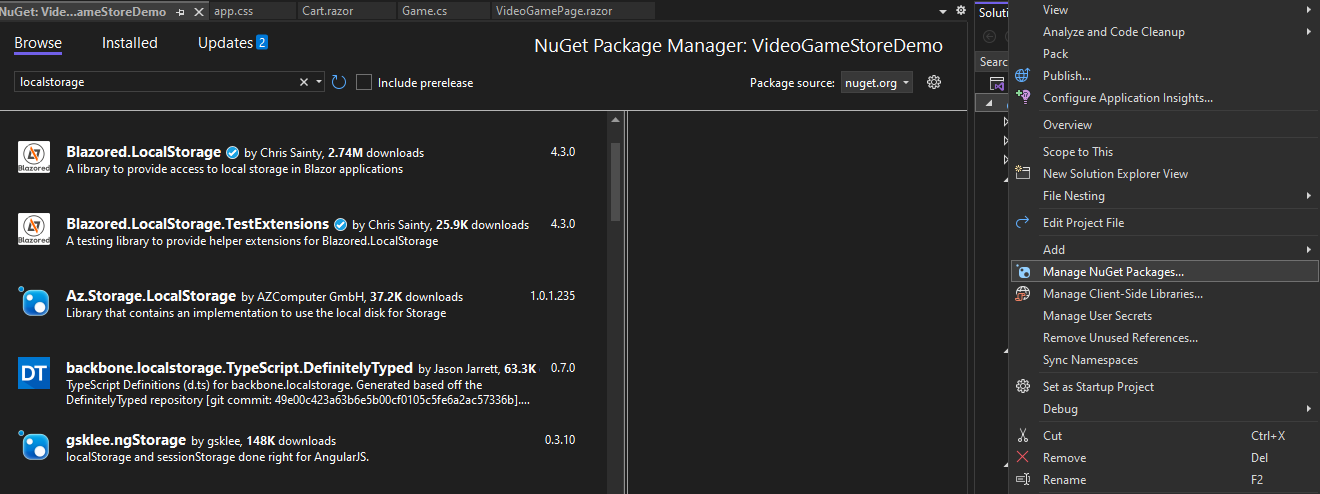
We will now be implementing the use of local storage. First, right click on the project and look for the option "Manage NuGet packages". When the page opens, search for "localstorage". The top option in the image shown is the one that we will use.

Find the Program.cs file in the project. In this file, add the highlighted code. This addition will allow us to use local storage with Blazor.

Now find the Import.razor file within the project. It should be next to the folders. Here, add this highlighted code.

Now, in both the video game page and the cart page, add these two lines of code underneath the page routing. We can now use local storage and JSON to work with data.
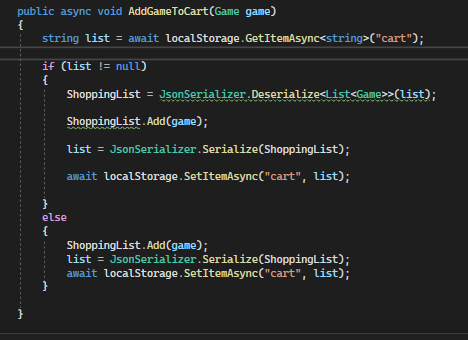
Now, add these new lines of code to the video game page. We will be updating the AddToCart method so that the page can store the products we want into the local storage. The code here opens the list in the local storage and puts the item into the it.
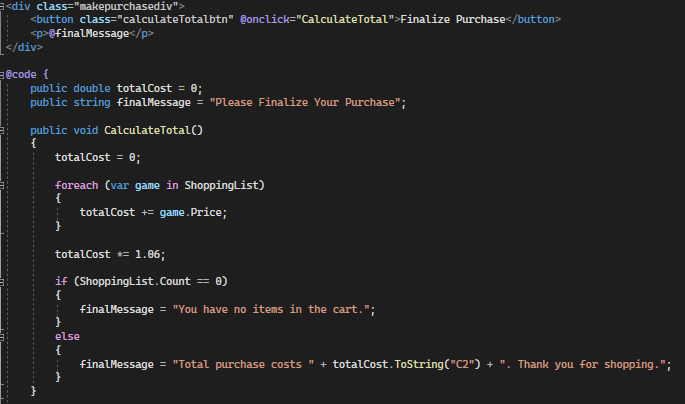
In the cart page, add these lines of code and HTML to the page. This new section will display the final cost of the purchase. The new function will be used to calculate this cost of the products in the shopping list.
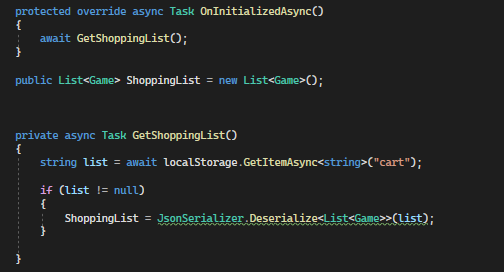
We will now add methods that will allow the cart page to access the local storage and retrieve the products that you chose to buy. The OnInitializeAsync method will automatically call the GetShoppingList method to access the local storage and retrieve the products.
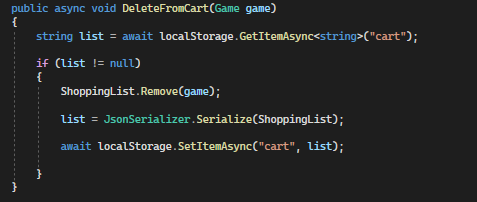
Now, update the DeleteFromCart method. We will use code similar to the video game page's AddToCart method to delete a product from our cart. This method will get the stored list from the local storage and delete the product from it.
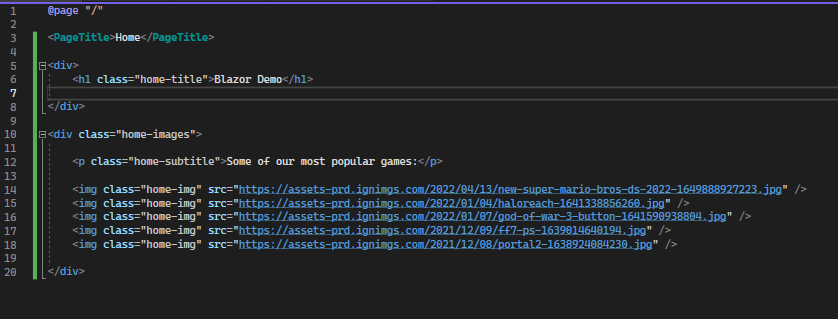
Here is some example code for creating the index page.
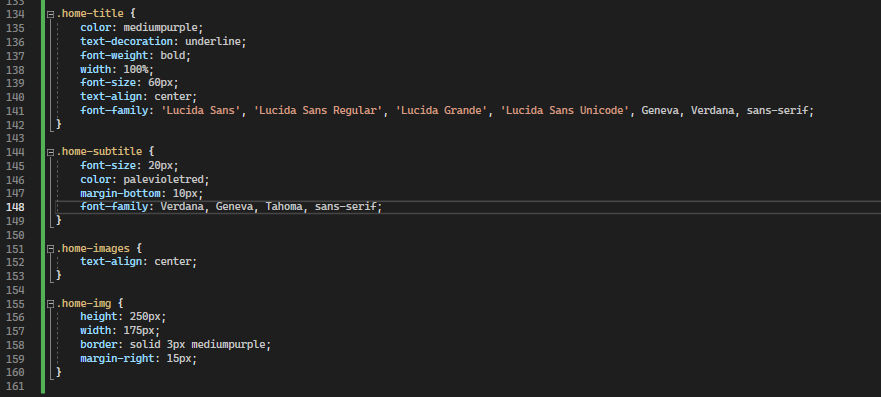
Here is some sample CSS for the index page. Feel free to add additonal CSS to the rest of the site.
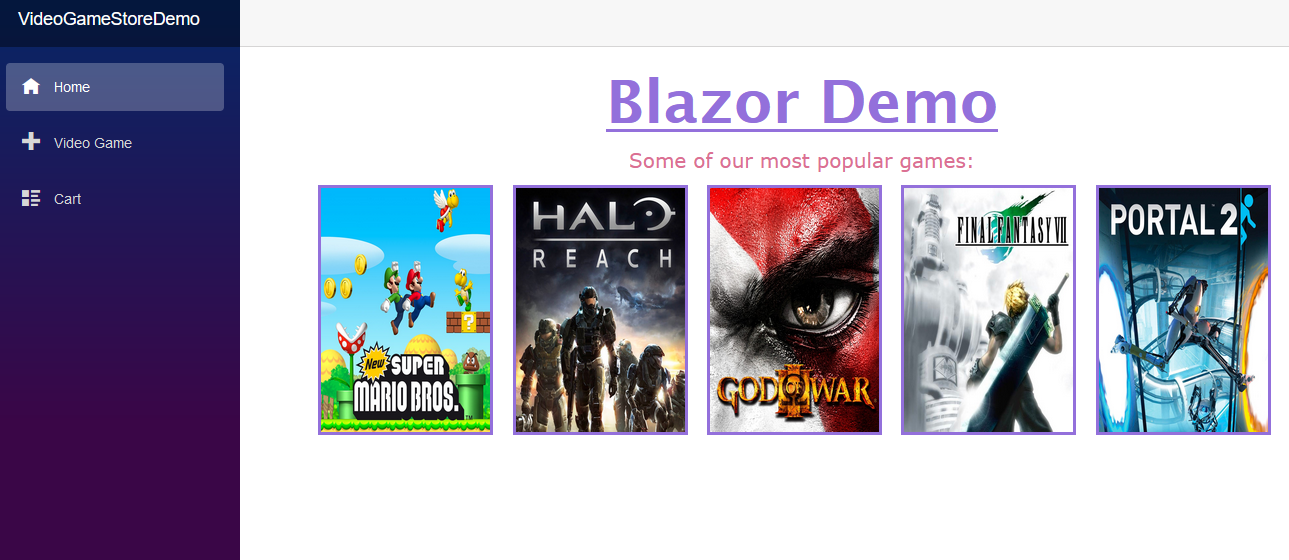
Here is what your home page could potentially looke like.
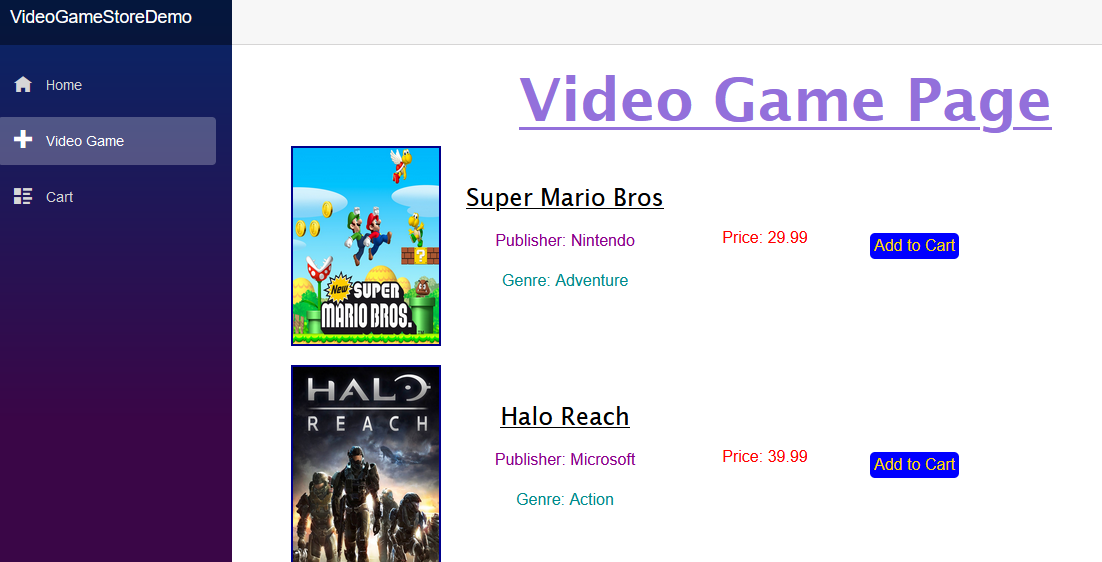
Here is the video game page. This page will display the games that you created and the option to add them to your cart. Clicking the "Add to Cart" button for any product should access the local storage and store the item in it.
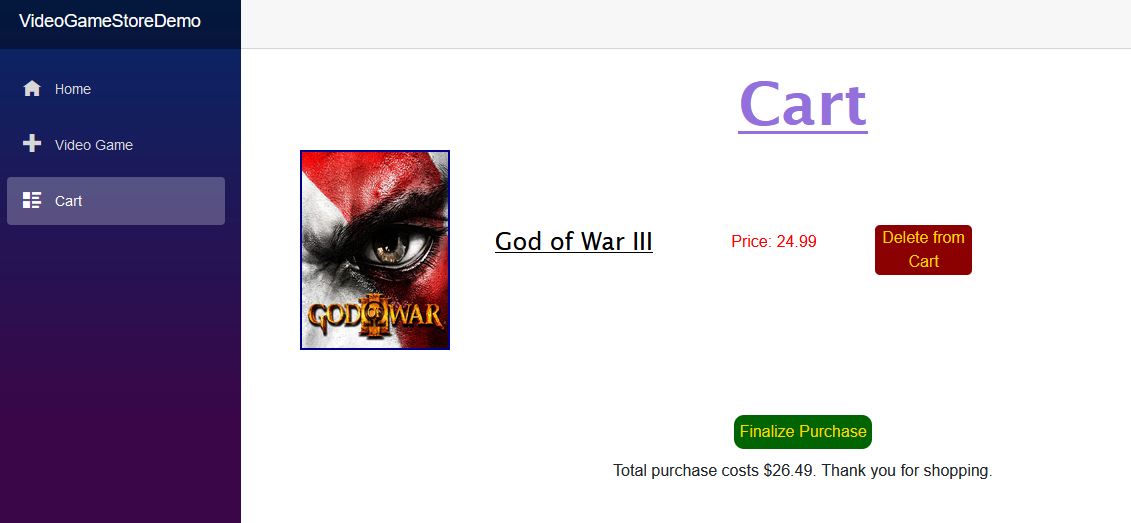
Here is the cart page. This page will automatically display the products that you chose to buy. The cart page will access the local storage
and display each product. Click the "Delete from Cart" button to remove the product from the page and local storage. Finally, click
the "Finalize Purchase" button to get the total cost of the products in your cart.
Congratulations, you have successfully created a
Blazor application that has functional add/delete buttons, uses a class to instantiate objects,
and uses the local storage to store and remove data.
Blazor is a continuously growing frameowork that proves to be quite the tool for application and web development. With its use of the ASP.NET core, developers have access to many already established .NET libraries and are able to share their code. The use of C# allows for easier coding and implementation of .NET features. The ability to create projects for both client-side and server-side faciliates a crucial part in the development process. The integration of Razor lets developers combine different languages to efficiently create and reuse components and pages in their projects. Overall, Blazor is an incredibly useful framework with many core features that facilitate development and enable more creativity.