-
The first step to making an Aurelia website is to install Aurelia and all needed parts to make sure the application can be built properly. To do this you need to head to the website and download NodeJS. After installing NodeJS you need to head to your cmd and enter the following text "npm -install -g aurelia-cli".

-
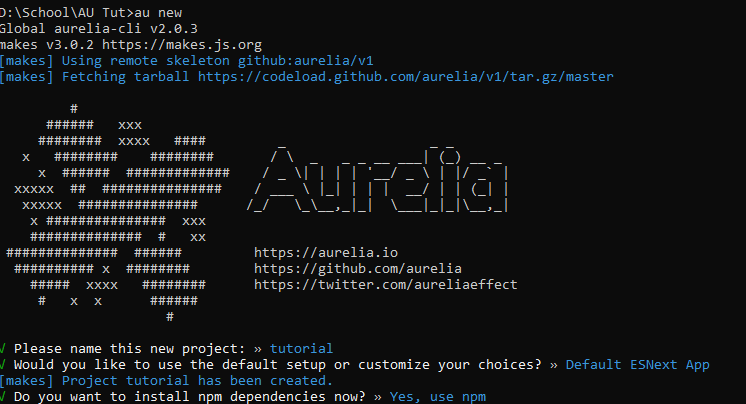
The next step of creating your Aurelia project is to actually create one. To do this head to the correct directory in your cmd and make sure that the folder is the one that you want to create your project in. Then in the cmd type "au new". After it will give you the option to name your project. Name it whatever you want and then click enter. After it will allow you to choose between JavaScript and TypeScript among a few other slight options. For this class we will just use JavaScript. After this click yes to install dependecies and the project will be created.
-
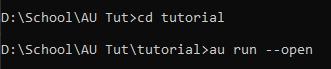
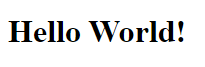
Now that the project is created we should learn how to run and test our code. This is a little more complex than just the typical opeping of an HTML file. To run and test your code for Aurelia, nake sure you are in your correct directory and then in your cmd type "au run --open". This will run and compily your code and then open it on your localhost for you. If you have done everything correctly you should see a rather basic HTML page that just says "Hello, World!". If you can see that, it means you are well on your way to making your first Aurelia project.
-
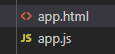
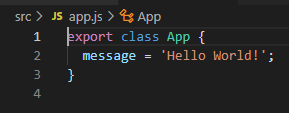
Now you need to open your folder in any IDE or text editor of your choice. Inside you will want to open the "src" folder and then you will see the main files that you will want to work with. There a bunch of other files in the folder but the 2 files we want to focus on for our simple application are "app.html" and "app.js". These two files will contain all of the application. You can add more files as you need, but for our simple application we will just need those two.
-
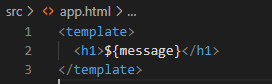
The first thing you should notice is that the message in the HTML page is directly linked with the message in the javascript page. This is one of the ways that Aurelia links all of the data from the model to the view. You can change the message and you can see the website directly change. The localhost server will automatically refresh when you save your code, so you can see that message changes as soon as you save the code.
-
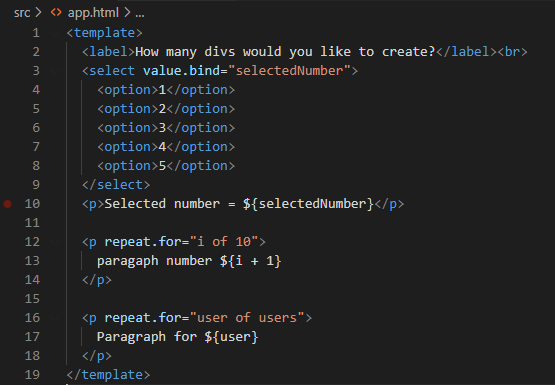
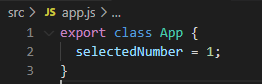
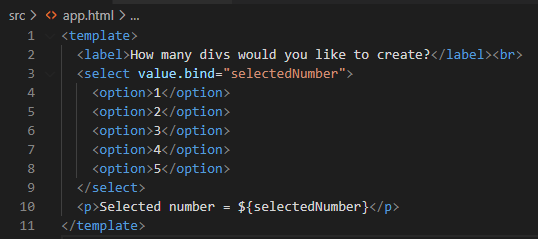
Now lets go ahead and create a simple little dropdown menu that will allow you to create some paragraphs depending on the number you choose. To do this lets start with adding a label and then adding the select. After adding the select we need need to bind the value to a variable. So we can add "value.bind="selectedNumber"" and then it will bind the option to the variable. Lets also add some code right after so that we can see the variable changing in real time. This is an important step for creating applications in Aurelia. Binding data between the model and the view is how most appsin Aurelia are created it and we used it a lot for creating our application.

-
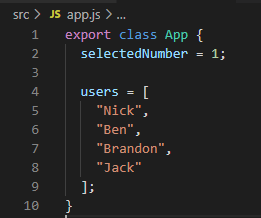
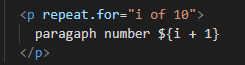
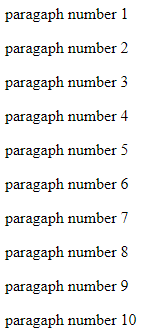
The other important part for creating applications in Aurelia is iteration. We can use "repeat.for" to do this. We can use this to create a bunch of divs or paragaphs or anything. We can bind this to many things. One of these is arrays. You can do this by putting "repeat.for="user of users"". This would let you iterate through list of users and using each user to create different things. For our example we will just iterate through a number that you can choose. You can do this by typing "repeat.for"i of 10"". This will create 10 paragraphs the same. You can also add in so that is shows the current iteration like in the example.
-
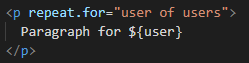
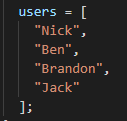
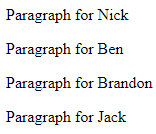
To end this I will also show how you can create paragrphs for each item in an array. To do this we will first create an array in the javascript file. Then in the HTML file do the same thing as we did in the last step. The difference is in that we need to instead do it for an array this time. Make the paragraph and then add a repeat.for with blank of the array. This will look like the pictures below.
-
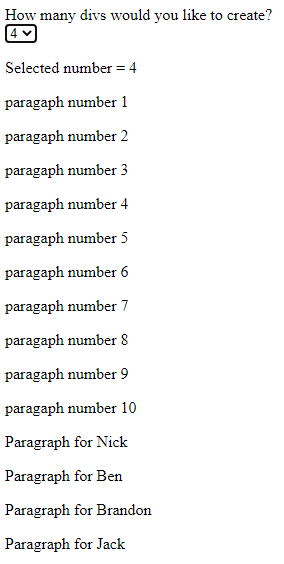
Those are all the basics that were used in our web application. Once you understand these things, you can really go far and create what you want in Aurelia and also continue to learn more as the is always a lot more to be learned. Below I will show the final code that we have for the tutorial and then also the expected results. Following that I will also provide a link to our web application so you can check that out too! Thanks for reading our tutorial and I hope you learned a lot!