Nuxt.js
Prerequisites
- node - at least v10.13 We recommend you have the latest LTS version installed.
- A text editor, we recommend VSCode with the Vetur extension or WebStorm
- A terminal, we recommend using VSCode's integrated terminal
create-nuxt-app
npm init nuxt-app + "project-name"
This command will create all nuxt dependencies. It will ask you some questions (name, Nuxt
options, UI framework, TypeScript, linter,
testing framework, etc. To find out more about
all the options see the Create Nuxt app.
Once all the questions are answered, the project files will be downloaded.
The next step is find your way to the project folder using the terminal and run
the nuxt project. Use the following command to run the project:
npm run dev
Pay close attention to the terminal output. This will provide information on what localhost port your application will open in. Most likely this will be http://localhost:3000.
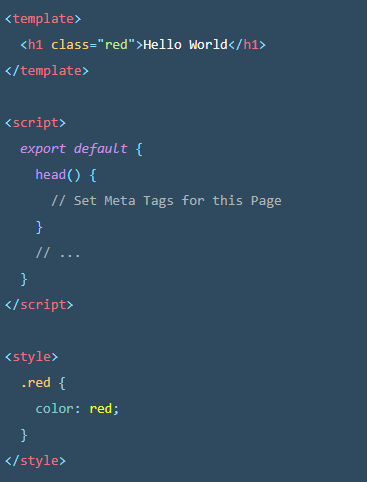
Pages
Just like we have HTML pages for class development
in visual studio, there are pages in a NUXT project that
act as the set up for client side display.
Each page includes a template tag, script tag and a style tag. You are able to
configure the styles and functions of each page within the file for that page.
Database: MariaDB
MariaDB Server is one of the world’s most popular open source relational databases. We chose to use this database server to set up our entertainment database that housed our media table. This database served as the starting point for data retrieval and the end point for data submission via the movie application. We interacted with the DB mainly using RestAPI and Sequelize.
Creating a Rest API using Node.js
Begin by making an assets folder. If this folder already exists in your nuxt project, navigate to the folder using the terminal and run the followig command to create a new folder to store database and API related files.
$ mkdir nodejs-express-sequelize-mysql
$ cd nodejs-express-sequelize-mysql
Next step is to initialize the application with a package.json file. Below is the terminal command to initialize the application and the suggested application fill out of the package.json file.
npm init
name: (nodejs-express-sequelize-mysql)
version: (1.0.0)
description: Node.js Rest Apis with Express, Sequelize & MySQL.
entry point: (index.js) server.js
test command:
git repository:
keywords: nodejs, express, sequelize, mysql, rest, api
author: Name
license: (ISC)
Is this ok? (yes) yes
Next step is to install Express, sequelize, mysql2 and body-parser. These modules are necessary to create and run the server side aspect of the application. Run the following command in your command folder. Make sure that you are in the correct directory and folder.
npm install express sequelize mysql2 body-parser cors --save
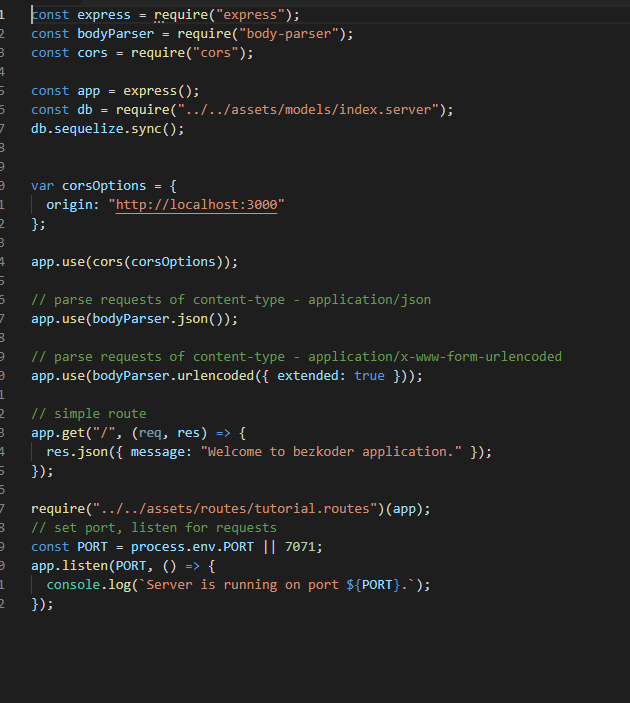
Once the installation has completed, it is important to make the server.js file. This file is sed to initialize the path or the url to which the database information will be sent and recived. The api will url will be initialized within this file. Make sure that this folder is created in the "nodejs-express-sequelize-mysql" root folder.
const express = require("express");
const bodyParser = require("body-parser");
const cors = require("cors");
const app = express();
var corsOptions = {
origin: "http://localhost:3000"
};
app.use(cors(corsOptions));
// parse requests of content-type - application/json
app.use(bodyParser.json());
// parse requests of content-type - application/x-www-form-urlencoded
app.use(bodyParser.urlencoded({ extended: true }));
// simple route
app.get("/", (req, res) => {
res.json({ message: "Welcome to bezkoder application." });
});
// set port, listen for requests
const PORT = process.env.PORT || 8080;
app.listen(PORT, () => {
console.log(`Server is running on port ${PORT}.`);
});
Some things to keep in mind. Notice that the port number is 8080. If you have created APIs before or based on the configuration of your computer, this port may already be occupied. This will prompt an error when you try to run the server.js file that explicity states that the port number of your choice is already occupied. In this case, simply change it to a different port number. For our project, we use 7071. Also, many templates may tell you the origin URL is 8081. But, this url should initialized with whatever local host port that your nuxt project is running on. This is important because the origin url defines where the information is being sent and recived by the API we are creating. Below is a picture of the final code for the Movie Rater project. Click the picture to view the code.
Next step is to configure the MySQL database and sequelize. Within you assets folder, you must now create a db.config.js file. This file will hold the information regarding your database. Including the hostname, username and password. This file will also intiialize to the API, what database you will be writing to. Below is the blanket template that is used for db.config.js. You simply will need to switch out the information within the definitions to match your database.
module.exports = {
HOST: "localhost",
USER: "root",
PASSWORD: "123456",
DB: "testdb",
dialect: "mysql",
pool: {
max: 5,
min: 0,
acquire: 30000,
idle: 10000
}
};
Initialize and Define Sequelize
This requires a sereis of files within the models folder. They require configuration.
Once dbconfig file is wired into the index.js file, it is important to rewrite the tutorial.model.js
file to hold parameters that pretain to the information being sent to and recieved from your database. To learn how to create a models folder
and the contents of this folder visit this page. Go to the headings titled
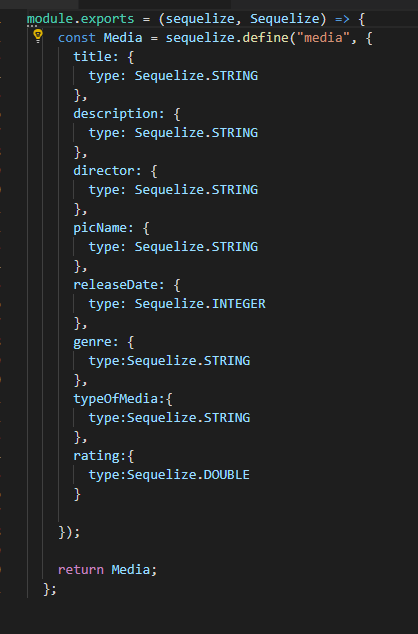
"Initialize Sequelize" and "Define the Sequelize Model". View the code below to see how tutorial.model.js file was changed for the Movie rater application.
It is important to make these "model" folder within the assets folder. The prohect we are creating using nuxt is slightly different form the tutorial.
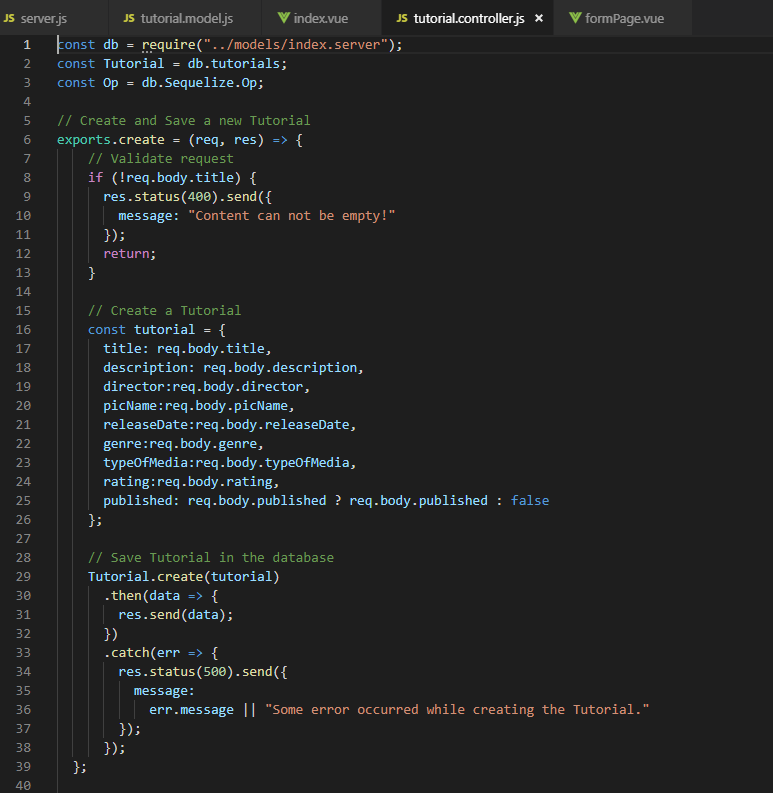
After the model is created, it is time to make the controllers what will be assigned
to post commands in order to run the API. It is important that you define and configure all
of the functions defined in the controller file because this determines the accuracy of what is sent
and what is recieved by the database.The functions and their definition can be found here.
It is important to pay attention to the create method. This method initially contains generic information that needs
to be over written in order to pull all of the database columns accoring
to how you set your DB up.To see the comparison between the generic code and movie rater project, please click and review the
picture below.
Initialize and Define Sequelize
This requires a sereis of files within the models folder. They require configuration.
Once dbconfig file is wired into the index.js file, it is important to rewrite the tutorial.model.js
file to hold parameters that pretain to the information being sent to and recieved from your database. To learn how to create a models folder
and the contents of this folder visit this page. Go to the headings titled
"Initialize Sequelize" and "Define the Sequelize Model". View the code below to see how tutorial.model.js file was changed for the Movie rater application.
It is important to make these "model" folder within the assets folder. The prohect we are creating using nuxt is slightly different form the tutorial.
After the model is created, it is time to make the controllers what will be assigned
to post commands in order to run the API. It is important that you define and configure all
of the functions defined in the controller file because this determines the accuracy of what is sent
and what is recieved by the database.The functions and their definition can be found here.
It is important to pay attention to the create method. This method initially contains generic information that needs
to be over written in order to pull all of the database columns accoring
to how you set your DB up.To see the comparison between the generic code and movie rater project, please click and review the
picture below.
The fina step is to connect all of the functions created in the controller with the resful api requests such as GET, POST, DELETE, UPDATE etc. This allows you to run the api within POSTMAN and view the database information through the API. You are able to confirm that the wirings will connect properly to the DB and you are also able to check if it writes and retieves the correct information based on the requests you send via postman. If this returns the desired behavior, it is confirmation that the wirings you did are correct and then wiring the api will now connect successfully to the client side. Review code below. Note that the code includes "tutorials" as the api identifier. This is subject to change according to how you wire and name your variables as you create all the server files. For the movie rater, tutorials will be replaced with media.
module.exports = app => {
const tutorials = require("../controllers/tutorial.controller.js");
var router = require("express").Router();
// Create a new Tutorial
router.post("/", tutorials.create);
// Retrieve all Tutorials
router.get("/", tutorials.findAll);
// Retrieve all published Tutorials
router.get("/published", tutorials.findAllPublished);
// Retrieve a single Tutorial with id
router.get("/:id", tutorials.findOne);
// Update a Tutorial with id
router.put("/:id", tutorials.update);
// Delete a Tutorial with id
router.delete("/:id", tutorials.delete);
// Delete all Tutorials
router.delete("/", tutorials.deleteAll);
app.use('/api/tutorials', router);
};
POSTMAN
Postman is the collaboration platform for API development. Postman simplifies each step of building an API and streamlines collaboration so you can create better APIs—faster. Post man came in handy for the movie rater project because it provided a better interface for checking our server side functions. The postman requests were used to confirm if the desire behaviors were being executed by the server side scripts and if the DB was updating live. In some cases, we even had the option of browsing the "code" feature in postman that formated the requests in NodeJS to be run in the client side page as functions. To download and use postman, please click the postman logo below.

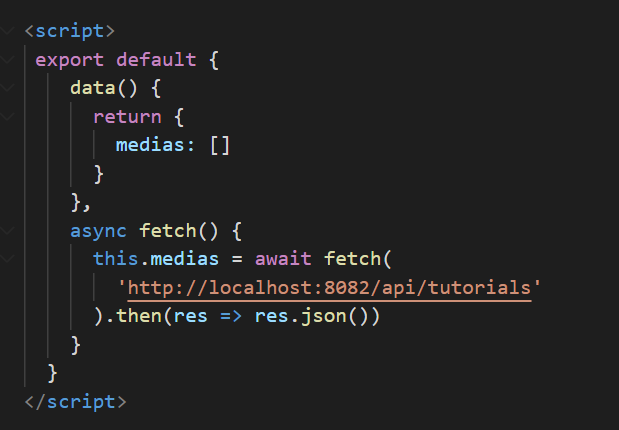
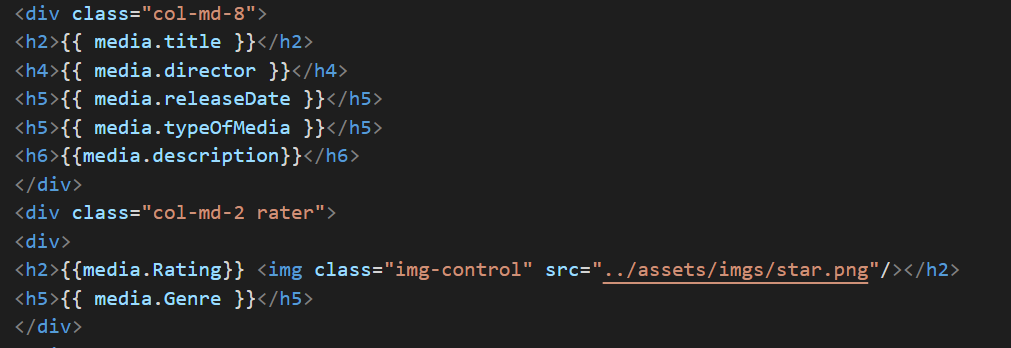
Data Display
Now that we've secured a connection to the database using a restful API, its time to display our data onto the
application. We must first retrieve the data by fetching information through the API, then store said information
into a variable. After that's done, we return the data through an array that shares the same name as the
variable holding the information. This array makes the information available to use throughout the vue page.
You can control where and how the information is displayed through HTML/bootrap tags, and the variable name
sandwiched between two sets of curly braces.
{{ example }}
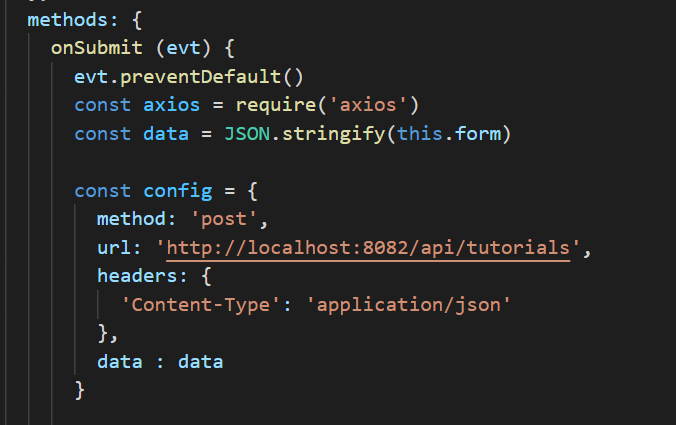
Writting information to the database is achievable through axios, with an api installed with nuxt. After creating a form you must ensure all the fields match up with the fields on the table which you are writting to. Once that is guaranteed you can then stringify the form data to prepare the storage. Don't forget to require axios too, since we will be using this to send the request to the connecting api. Now we must store the request in a variable, declaring the method (post, get,etc..), url to your api (mine was http://localhost:8082/api/tutorials), and headers. With the request made, it is now time to feed it to axios. You can show the response from the database in the console log, just remember to catch any errors. If you refresh the table in mariadb, the record should now be part of the table.